
Packer and Terraform Development - Part 2
As I mentioned in part one of this series I have been doing a lot of infrastructure as code recently. I really wanted a template I could start with that would allow me to create one or more images with as much as I need pre-installed on them and the use them as the basis for creating infrastructure in Terraform.
When you have Terraform creating infrastructure you have the power to install things while you create that infrastructure but if you are creating more than one of anything then it will greatly slow down your Terraform process. Because of this I like to split my creation into two phases. First I try to install and pre-configure using Packer whatever doesn’t change based on the Terraform. After that point I try to use the Terraform to make configuration and alterations based on the variables in Terraform using the Packer image. The power of this pattern vs. using something like Ansible is less overhead when generating infrastructure because once your Packer image is correct you are usually 90% the way there.
Terraform Development Pattern
When working with Azure the Terraform setup is pretty straightforward but there are some things I like to get setup in a repeatable fashion like we did with Packer. Those things involve getting a storage access key to where Terraform can use Azure as a backend state storage. We also switch into a workspace because This allows the developer’s use of the terraform definition to not get mixed up with the production pipeline use cases. It also helps to get the developer thinking of infrastructure as having a state that is tracked.
Preparing a storage account for Terraform State
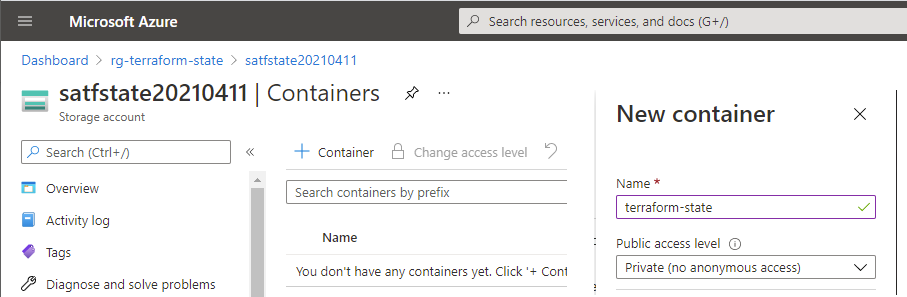
We need to create a storage account that all the terraform state files can be held in remotely. Navigate to the portal and create a new storage account. We are going to use the following settings for our use case.
- Resource group:
rg-terraform-state - Storage account name: Up to you and should be globally unique. I named mine for this blog
satfstate20210411 - Location:
East US(but you can choose whichever you want) - Performance:
Standard - Account Kind:
BlobStorage - Replication: Up to you, for this purpose I chose (
LRS)
Make sure that you give it a public endpoint (all networks) on networking or you will not be able to access the storage files from a developer machine. Taking the rest of the defaults unless you have special needs. Once this is done we can go and prepare a starter terraform main file that uses our state storage after we make our container. To make a storage container in this storage account you navigate into the storage container and select the + Container button and press create. Make sure you create a private container named terraform-state as that is how we are referring to the storage container from the terraform file main.tf.
Creating our initial terraform main.tf file.
We need to know a few things before we can create this file. Specifically, we need to know our subscription ID and our tenant ID. To find those you can login in a powershell console and then issue the command to list your current subscription.
az login
az account set --subscription="My Azure Subscription"
az account show | ConvertFrom-Json | Select Id, tenantId | Format-List
The id value is your subscription ID and the tenantId value is your tenant ID. Using these values create a new text file named main.tf at the root of your source code. It will look something like this.
main.tf Terraform base creation file.
# Configure the Azure provider and connect to subscription
provider "azurerm" {
    subscription_id = "fce8bb4e-xxxx-xxxx-xxxx-xxxxxxxxxxxx"
    tenant_id       = "d73a39db-xxxx-xxxx-xxxx-xxxxxxxxxxxx"
    features {}
}

terraform {
  backend "azurerm" {
    storage_account_name = "satfstate20210411"
    container_name       = "terraform-state"
    key                  = "myubuntu.tfstate"
  }
}
You will need to update several things in this file. These include the subscription_id and tenant_id you looked up earlier. You also need to add the name of the storage account you created in the previous step in the value storage_account_name. Finally you should name the key something specific to your project.
Installing Terraform for Windows
Now we need to install the terraform tools and this can be done on Windows by using Chocolatey. You probably want to be running Windows Terminal or the command line as administrator.
choco install terraform
After you have installed terraform if you run terraform --version you should see the installed version. As of the writing of this article terraform is at version 0.14.10 and I am using 0.14.9 which is the newest supported by chocolatey.
While you are at it you might want to install putty also because we are going to use it to SSH into the VM at the end of this blog post.
choco install putty
Setting up the secret for the backend storage account
Our backend definition is missing one critical element, something called access_key this is the secret that gives you access to read and write to that blob storage account. Just like with packer we are going to build a small developer powershell that will create that file in our devkeys folder for the developer so they don’t accidentally check in that file.
terraform-createaccesskey.ps1 Powershell to generate terraform backend configuration file.
# -----------------------------------------------------------------------
# To run this you would type .\terraform-createaccesskey.ps1 somename.hcl
# -----------------------------------------------------------------------

$storageAcctName = "satfstate20210411"  # Update this variable with your storage account name

# ---------------------------------------------------------------------
# Validate Inputs
# ---------------------------------------------------------------------
if ([string]::IsNullOrEmpty($storageAcctName))
{
   Write-Error "Please set the storageAcctName variable in the terraform-createaccesskey.ps1 powershell with your backend azure storage account name."
   exit
}

if ($args.Length -eq 0)
{
   Write-Error "Please call the terraform-createaccesskey.ps1 with a backend file name of the user. For example .\terraform-createaccesskey.ps1 demouser.hsl"
   exit
}

# ---------------------------------------------------------------------
# Read storage account access keys
# ---------------------------------------------------------------------
$keys = az storage account keys list --account-name $storageAcctName --resource-group rg-terraform-state -o json | ConvertFrom-Json

# ---------------------------------------------------------------------
# Store the access key in the specified backend configuration file
# ---------------------------------------------------------------------
$filename = "devkeys/$($args[0])"
"access_key = ""$($keys[0].value)""" | Out-File -FilePath $filename -Encoding utf8

"Wrote $($filename). Protect this file's storage account secret and do not commit to source control"
We can run this in Powershell by specifying a backend configuration file name. Make sure you are logged into Azure with az login first.
.\terraform-createaccesskey.ps1 demo.hcl
Remember if you didn’t follow part one of this series to make sure you add the devkeys folder to your .gitignore file so these secrets do not get checked into source control.
Initializing Terraform
Now that we have a backend configuration file we can ask Terraform to generate an initial state file and get us ready to start building something. We do that by issuing the Terraform init command and providing our configuration file on the command line.
terraform init --backend-config=devkeys\demo.hcl
You should see something like the following when you type this command.
Initializing the backend...

Initializing provider plugins...
- Finding latest version of hashicorp/azurerm...
- Installing hashicorp/azurerm v2.55.0...
- Installed hashicorp/azurerm v2.55.0 (signed by HashiCorp)

Terraform has created a lock file .terraform.lock.hcl to record the provider
selections it made above. Include this file in your version control repository
so that Terraform can guarantee to make the same selections by default when
you run "terraform init" in the future.

Terraform has been successfully initialized!

You may now begin working with Terraform. Try running "terraform plan" to see
any changes that are required for your infrastructure. All Terraform commands
should now work.

If you ever set or change modules or backend configuration for Terraform,
rerun this command to reinitialize your working directory. If you forget, other
commands will detect it and remind you to do so if necessary.
One last thing I like to do is switch into my own workspace. This is so my state file and the production state file don’t have the same name accidentally. To do that I usually use my initials and the following command. Remember that this is making the assumption that the variables I am going to use and the ones used in the production pipeline will be different and we will not be building the same infrastructure instances.
terraform workspace new pjl
Creating Ubuntu VM based on our packer image.
Although this terraform is super simple I want to show a complete example before we start creating more complex infrastructure in later blog posts. In this terraform we will create an azure virtual machine with a public IP that you can SSH into. We will reference the Packer image generated by the previous part one of this blog series.
The first step is to create a variables.tf file with all of our configurable values. These allow both the final production pipelines and the developer builds to have different names and values for the things we create. Here is the variables.tf for our simple VM creation.
variables.tf terraform variable definition file
variable "instance_name" {
  type        = string
  description = "The base name of the instance."
  default = "demo"
}
variable "instance_azure_region" {
  type       = string
  description = "The Azure region to create the instance inside."
  default = "eastus"
}
variable "instance_azure_region_alias" {
  type     = string
  description = "The alias for the Azure region to use in naming"
  default = "eaus"
}
variable "instance_number" {
  type   = number
  description = "The instance unique number in the region"
  default = 1
}

variable "instance_vm_user_name" {
  type     = string
  description = "Virtual Machine User name"
  default = "MyUbuntuAdmin"
}

variable "instance_vm_size" {
  type     = string
  description = "Virtual machine size"
  default = "Standard_D4s_v4"
}

variable "instance_publicvnet_cidr" {
   type        = string
   description = "The CIDR block for the public virtual network"
   default = "10.0.0.0/16"
}

variable "packer_image" {
   type        = string
   description = "The base custom managed image for the server produced from the packer pipeline"
   default = "myubuntu-202104110944"
}

variable "packer_image_resource_group" {
   type        = string
   description = "The resource group that holds the custom packer produced OS images"
   default = "rg-osimages-eaus"
}

variable "tags" {
  type = map

  default = {
    group       = "Engineering"
    project     = "Demo"
  }
}
Let’s go through each one of these variables and why we want them in the file.
- instance_name: This is the base name of all resources created for this instance. It defaults to demo but in production pipelines would be renamed.
- instance_azure_region: This is the azure region to create all of this infrastructure inside.
- instance_azure_region_alias: This is a short form of the azure region used as part of our naming standard on all resources.
- instance_number: While this defaults to 1 it allows us to make many copies of this infrastructure with the same base configuration and its part of our name.
- instance_vm_user_name: This is the user account used for the VM.
- instance_vm_size: This is the size of the VM to create. This should be consistent with the packer definition used.
- instance_publicvnet-cidr: This is the CIDR block for the public network we are creating our network adapters (public IP addresses inside).
- packer_image: This is the name of the generated image based on the first part of this blog series.
- packer_image_resource_group: This is the name of the resource group where the packer images are stored.
- tags: This is the map of tags to apply to all resources. Using tags are a good practice when you start to generate a lot of infrastructure.
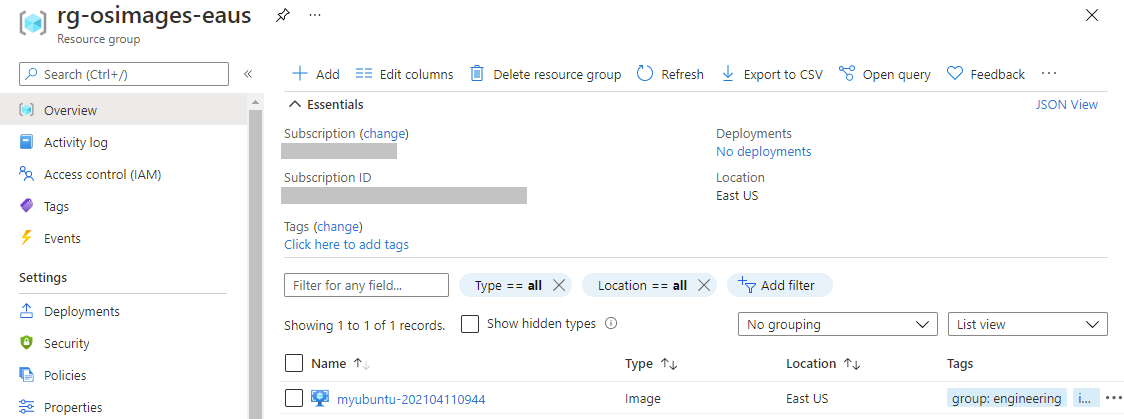
How I found the packer image name
In future blog posts I will show some better ways to tag images and dynamically pull the name but for now after generating the packer image based on the steps in part one of this series you can login to the azure portal and look at the storage account. This will show you all the images that you have generated that are available.
Developer variable overrides
There are several different ways to override variables for the developer. One that I like is use of a terraform.tfvars file. In this file just enter any of the variables you have defined and want to override. For example in this case I am overriding the base name.
Example terraform.tfvars file for variable overrides
instance_name = "blogdemo"
With the Packer and Terraform configuration setup it might be good to review your .gitignore file is not allowing you to commit things you shouldn’t commit. My .gitignore for this combined repository now looks like this. Note that the .tfvars file is marked to not be committed along with anything put into the devkeys folder.
*.tfstate
*.tfstate.*.backup
*.tfstate.backup
*.tfvars
crash.log
.terraform/
/.vs
/**/devkeys
/**/packer_cache/
*.box
Final terraform to create the VM image
What follows is an update to the main.tf terraform file to create the resources needed to create our VM.
I am naming resources with a specific naming convention that is loosely based on these recommendations for prefixes by Microsoft. You will see things using this like the virtual network which is defined as
"vnet-${var.instance_name}-${var.instance_azure_region_alias}-${var.instance_number}"and should end up creating names likevnet-blogdemo-eaus-1.
This is what is being created in order.
- data “azurerm_client_config” “current”. We add this to be able to read the tenant ID in the terraform for the current config.
- resource “azurerm_resource_group” “rginstance”. This creates a resource group to put all of this stuff inside.
- resource “azurerm_virtual_network” “vm-network”. This creates a virtual network.
- resource “azurerm_subnet” “vm-network-snet”. This creates a subnet in the virtual network for adding our public IP addresses.
- resource “azurerm_public_ip” “vm-public-ip”. This creates a public IP address for the VM.
- resource “azurerm_network_security_group” “vm-nsg”. This creates a network security group allowing inbound SSH.
- resource “azurerm_network_interface” “vm-nic”. This creates the network interface for the VM and puts it inside the subnet we created and assigns it the public IP address we created.
- resource “azurerm_network_interface_security_group_association” “vm-nic-to-nsg”. This associates the network interface to the network security group limiting the traffic to SSH.
- resource “azurerm_storage_account” “storage-account-diag”. This creates a storage account for diagnostics.
- resource “tls_private_key” “vm-admin-key”. This generates a TLS private key secret for use with SSH to log into the VM.
- resource “azurerm_key_vault” “vm-key-vault”. This creates an azure key vault so we can store the login user name and SSH public and private keys for later use.
- resource “azurerm_key_vault_secret” “vm-admin-user”. This stores the user name in the vault as a secret.
- resource “azurerm_key_vault_secret” “vm-pub-key”. This stores the SSH public key in the vault as a secret.
- resource resource “azurerm_key_vault_secret” “vm-priv-key”. This stores the SSH private key in the vault as a secret.
- data “azurerm_image” “packer-image”. This gives us access to the packer image in the storage account.
- resource “azurerm_linux_virtual_machine” “example-vm”. This generates an Azure Linux VM using the packer image, SSH key, NIC, and diagnostic storage accounts we set up earlier in the terraform.
main.tf Terraform file to create infrastructure.
# Configure the Azure provider and connect to subscription
provider "azurerm" {
    subscription_id = "ccab678f-xxxx-xxxx-xxxx-xxxxxxxxxxxx" # My Subscription
    tenant_id       = "c8fa67be-xxxx-xxxx-xxxx-xxxxxxxxxxxx" # My Tenant
    features {}
}

terraform {
  backend "azurerm" {
    storage_account_name = "satfstate20210411"
    container_name       = "terraform-state"
    key                  = "myubuntu.tfstate"
  }
}

data "azurerm_client_config" "current" {}

# Create a new resource group for the instance
resource "azurerm_resource_group" "rginstance" {
    name                = "rg-${var.instance_name}-${var.instance_azure_region_alias}-${var.instance_number}"
    location            = var.instance_azure_region
    tags                = var.tags
}

# Create a virtual network within the resource group
resource "azurerm_virtual_network" "vm-network" {
  name                  = "vnet-${var.instance_name}-${var.instance_azure_region_alias}-${var.instance_number}"
  resource_group_name   = azurerm_resource_group.rginstance.name
  location              = azurerm_resource_group.rginstance.location
  address_space         = [var.instance_publicvnet_cidr]
    tags                = var.tags
}

# Subnet for VM resources
resource "azurerm_subnet" "vm-network-snet" {
  name                  = "snet-${var.instance_name}-${var.instance_azure_region_alias}-${var.instance_number}"
  resource_group_name   = azurerm_resource_group.rginstance.name
  virtual_network_name  = azurerm_virtual_network.vm-network.name
  address_prefixes      = [cidrsubnet(var.instance_publicvnet_cidr, 4, 0)]
}

#  Create Public IP Address for VM servers
resource "azurerm_public_ip" "vm-public-ip" {
  name                         = "pip-${var.instance_name}-${var.instance_azure_region_alias}-${var.instance_number}"
  location                     = azurerm_resource_group.rginstance.location
  resource_group_name          = azurerm_resource_group.rginstance.name
  allocation_method            = "Static"
  sku                          = "Standard"
  domain_name_label            = "${var.instance_name}${var.instance_number}"
  tags                         = var.tags
}

# Create Network Security Groups to allow HTTP/HTTPS inbound only
resource "azurerm_network_security_group" "vm-nsg" {
  name                        = "nsg-${var.instance_name}-${var.instance_azure_region_alias}-${var.instance_number}"
  location                    = azurerm_resource_group.rginstance.location
  resource_group_name         = azurerm_resource_group.rginstance.name

  security_rule {
      name                       = "allow-ssh"
      description                = "allow-ssh"
      priority                   = 110
      direction                  = "Inbound"
      access                     = "Allow"
      protocol                   = "Tcp"
      source_port_range          = "*"
      destination_port_range     = "22"
      source_address_prefix      = "*"
      destination_address_prefix = "*"
  }

  tags                  = var.tags
}

# Create NIC for Server VM
resource "azurerm_network_interface" "vm-nic" {
  name                        = "nic-${var.instance_name}-${var.instance_azure_region_alias}-${var.instance_number}"
  location                    = azurerm_resource_group.rginstance.location
  resource_group_name         = azurerm_resource_group.rginstance.name

  ip_configuration {
      name                          = "vmnicconfig"
      subnet_id                     = azurerm_subnet.vm-network-snet.id
      private_ip_address_allocation = "Dynamic"
      public_ip_address_id          = azurerm_public_ip.vm-public-ip.id
  }

  tags                  = var.tags
}

# Connect the security group to the NIC
resource "azurerm_network_interface_security_group_association" "vm-nic-to-nsg" {
  network_interface_id      = azurerm_network_interface.vm-nic.id
  network_security_group_id = azurerm_network_security_group.vm-nsg.id
}

# Provision storage account for VM diagnostics
resource "azurerm_storage_account" "storage-account-diag" {
  name                        = "diagexample${var.instance_number}"
  location                    = azurerm_resource_group.rginstance.location
  resource_group_name         = azurerm_resource_group.rginstance.name
  account_replication_type    = "LRS"
  account_tier                = "Standard"
  tags                        = var.tags
}

# Provision SSH Key
resource "tls_private_key" "vm-admin-key" {
  algorithm = "RSA"
  rsa_bits = 4096
}

# Create Key Vault for storing secrets and give access to the current terraform
resource "azurerm_key_vault" "vm-key-vault" {
  name                        = "akv-${var.instance_name}-${var.instance_azure_region_alias}-${var.instance_number}"
  location                    = azurerm_resource_group.rginstance.location
  resource_group_name         = azurerm_resource_group.rginstance.name
  enabled_for_disk_encryption = true
  tenant_id                   = data.azurerm_client_config.current.tenant_id
  purge_protection_enabled    = false
  sku_name                    = "standard"
  tags                        = var.tags

  access_policy {
    tenant_id = data.azurerm_client_config.current.tenant_id
    object_id = data.azurerm_client_config.current.object_id

    key_permissions = [
      "create",
      "get",
    ]

    secret_permissions = [
      "set",
      "list",
      "get",
      "delete",
      "purge",
      "recover"
    ]
  }
}

# Store VM admin user name in key vault
resource "azurerm_key_vault_secret" "vm-admin-user" {
  name            = "vm-admin-username"
  value           = var.instance_vm_user_name
  key_vault_id    = azurerm_key_vault.vm-key-vault.id
  tags            = var.tags
}

# Store public key to VM in key vault
resource "azurerm_key_vault_secret" "vm-pub-key" {
  name            = "vm-pub-key"
  value           = tls_private_key.vm-admin-key.public_key_openssh
  key_vault_id    = azurerm_key_vault.vm-key-vault.id
  tags            = var.tags
}

# Store private key to VM in key vault
resource "azurerm_key_vault_secret" "vm-priv-key" {
  name            = "vm-priv-key"
  value           = tls_private_key.vm-admin-key.private_key_pem
  key_vault_id    = azurerm_key_vault.vm-key-vault.id
  tags            = var.tags
}

# Get a reference to the desired managed image produced by Packer for the Ubuntu server
data "azurerm_image" "packer-image" {
  name                = var.packer_image
  resource_group_name = var.packer_image_resource_group
}

# Provision Linux VM
resource "azurerm_linux_virtual_machine" "example-vm" {
  name                              = "vm-${var.instance_name}-${var.instance_azure_region_alias}-${var.instance_number}"
  location                          = azurerm_resource_group.rginstance.location
  resource_group_name               = azurerm_resource_group.rginstance.name
  network_interface_ids             = [azurerm_network_interface.vm-nic.id]
  size                              = var.instance_vm_size
  computer_name                     = "exampleserver"
  admin_username                    = var.instance_vm_user_name
  disable_password_authentication   = true
  source_image_id                   = data.azurerm_image.packer-image.id
  tags                              = var.tags

  os_disk {
      name                  = "dsk-${var.instance_name}${var.instance_azure_region_alias}${var.instance_number}-vm"
      caching               = "ReadWrite"
      storage_account_type  = "Premium_LRS"
  }

  admin_ssh_key {
      username       = var.instance_vm_user_name
      public_key     = tls_private_key.vm-admin-key.public_key_openssh
  }

  boot_diagnostics {
      storage_account_uri = azurerm_storage_account.storage-account-diag.primary_blob_endpoint
  }
}

output "key-vault-name" {
  value = azurerm_key_vault.vm-key-vault.name
}
Running the terraform and generating the infrastructure
We can test that our plan is correct by issuing the following command.
terraform plan
We can generate this infrastructure with the following command and answering yes to generate the infrastructure.
terraform apply
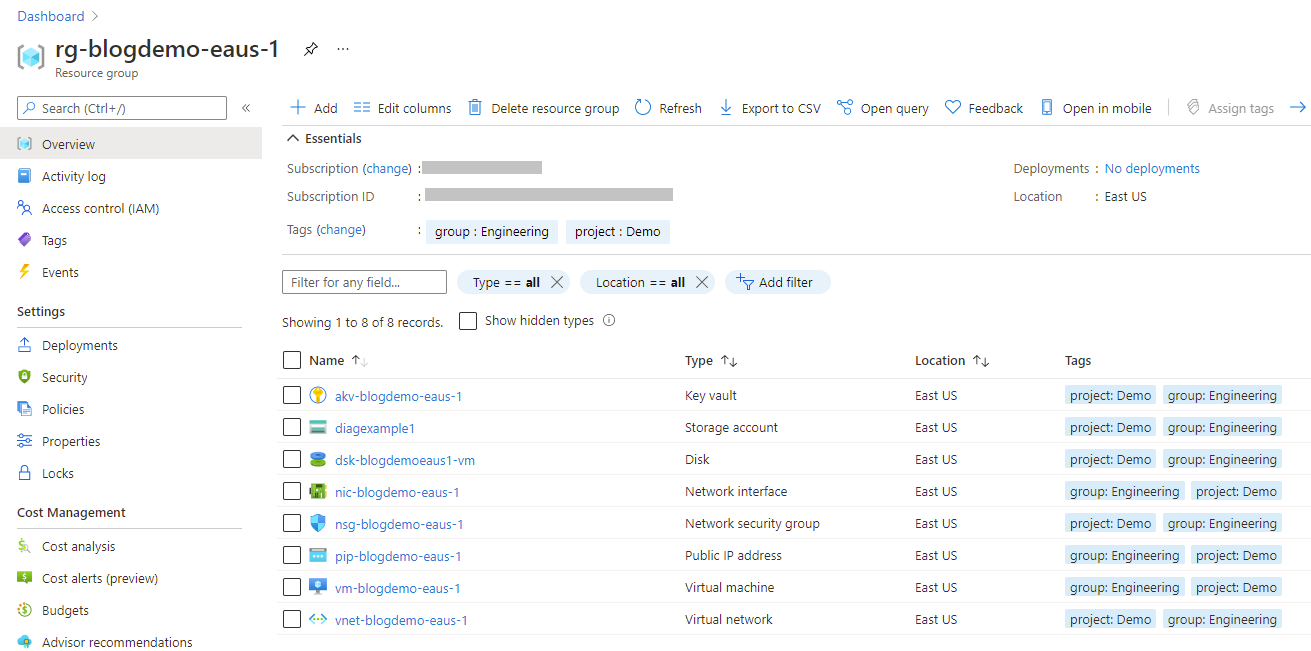
When it completes (in about 2 minutes) you should see something like this.
Apply complete! Resources: 14 added, 0 changed, 0 destroyed.

Outputs:

key-vault-name = "akv-blogdemo-eaus-1"
Testing the infrastructure
You will need access to the private key from your VM. To get this you need to do 2 things.
- Assuming you built the infrastructure you should have the access needed but you can verify that by logging into the portal and selecting the new resource group that was created, the azure key vault created in it,
Access policiesand verify that your user has the correct Secret Permissions. At minimum you will need get and list for secrets. - Using the name of the key vault shown when the terraform completed as an output
key-vault-nameyou can use the following command to get a copy of the SSH private key. Once again we are putting it into the devkeys folder because it is a secret.
az keyvault secret download --file devkeys\vmssh.ppk --name vm-priv-key --vault-name akv-blogdemo-eaus-1
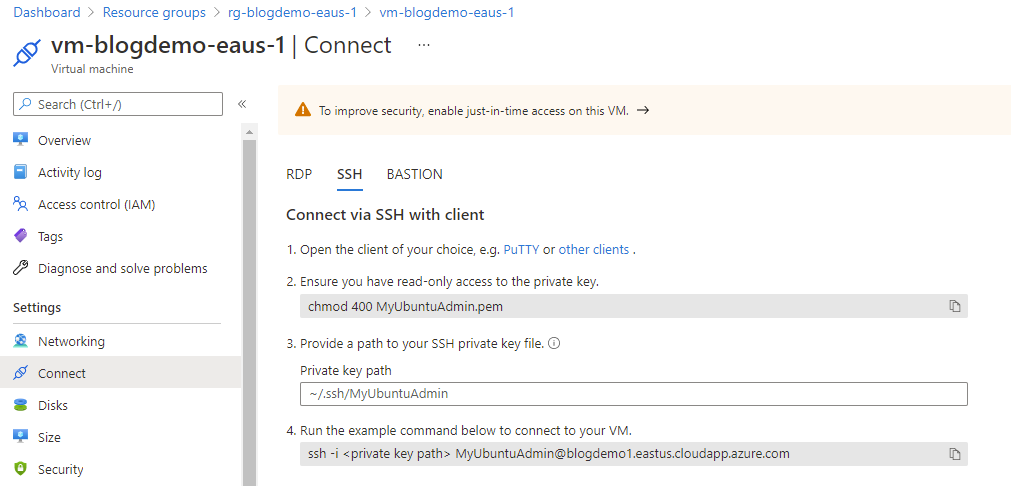
To find out your fully qualified VM name for SSH open up the Settings, Connect view in the VM that was generated and select SSH. The fully qualified login appears in step 4 The example command to connect.
Launch puttygen and select load and open up the devkeys\vmssh.ppk file. Press Save private key and yes to save without pass phrase (remember we are not checking this file in and protecting it) and save it back in the devkeys folder as vmssh_putty.ppk and close puttygen.
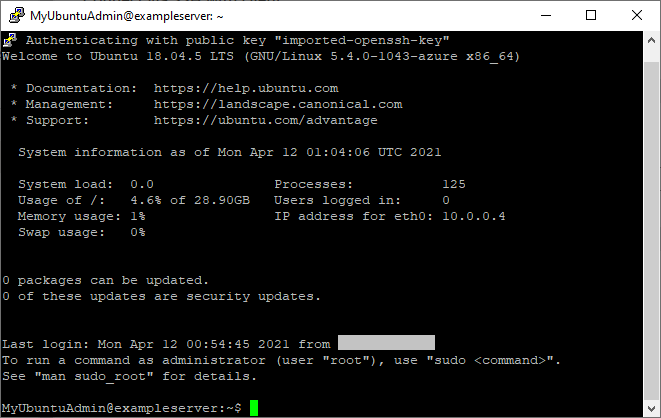
Launch putty from the command line so we can setup the SSH connection to our VM.
- In
Sessionforhost nameenter the fully qualified host name value from step 4 of the “Connect via SSH with client” instructions. For this example it wasMyUbuntuAdmin@blogdemo1.eastus.cloudapp.azure.com. - In
Connection,SSH,Authselect browse and select thevmssh_putty.ppkfile in your devkeys folder. - Return to session and enter a name in
Saved SessionslikeDevVMand pressSave - Now press
Opento connect to your VM.
Cleaning up
Assuming you are not going to use this infrastructure you can delete it by issuing the following command and answering yes.
terraform destroy
If all goes as planned you should see.
Destroy complete! Resources: 14 destroyed.
Now we have setup a repeatable development environment for Packer and Terraform and shown how we can make them work together. In the final part of this blog series we will setup Azure DevOps CI/CD pipelines to generate the Packer image and the Terraform Infrastructure based on a generated image. This will show how everything we did to create the development environment can be applied in production pipelines. While some of the pipeline steps are a bit different it shows how the variables we are creating and the patterns can be used in both automation and by developers.
- Paul