
Packer and Terraform Development - Part 1
Something I have been doing a lot is creating automation to generate cloud environments in Microsoft Azure. One thing that took me a while to figure out was how to have a good development experience using Azure as a backend when doing this development on Windows. In this post I talk about how I have setup a developer environment that is compatible with a CI/CD pipeline experience later. I love having a good CI/CD pipeline but I find doing development with running the pipeline repeatedly can be cumbersome and also hard to debug.
In this first part of the series I will describe how I built a development pattern for generation of a VM image using Packer and then setup that packer generated image as the basis for creating a VM in Azure. Later in the series we will setup a development environment for Terraform that references packer images generated and then setup Azure DevOps pipelines to do the same thing.
Packer Development Pattern
When working with Azure the Packer tools will create a dynamic resource group in Azure to generate a VM that is used to pack things on an image before it is prepped for reuse. In this article I will show the process of setting up this development for a Ubuntu 18.04 OS image. While the base Ubuntu image isn’t too compelling yet it forms the basis for lots of custom software and settings in the images we can produce in the future.
Installing Packer for Windows
The first thing you need to do is install the packer tools and this can be done on Windows by using Chocolatey. You probably want to be running Windows Terminal or the command line as administrator.
choco install packer
After you have installed packer if you run packer --version you should see the installed version. As of the writing of this article packer is at version 1.7.0 and I am using 1.6.4.
Setup for Azure Development
Since we are going to be developing on Windows with Microsoft Azure and using Powershell there are some things you need to setup so you can login and access your correct subscription. The main thing you need to install is the Azure Command Line Interface (or Azure CLI). You can do that by visiting the Azure CLI installation page and following the instructions.
Once it is installed you should do two commands. First, login to your azure subscription:
az login
Second, if you have access to more than one subscription you should set your current subscription. First you need to look up your subscription name if you do not know it by doing the az CLI command az account list. This should give you a list of 1 or more subscriptions you have access to connect to use and what you are looking for is the name of the subscription. Once you have the name you can tell the Azure CLI to switch to that subscription with a command like the following by substituting the name for your subscription’s name.
az account set --subscription="My Azure Subscription"
If you run the az account list command again you will see that this is record now has the isDefault set to true indicating that it is the default subscription for all azure commands in this session.
Getting a Service Principal for Development
One of the automation scripts that I added is a powershell script to go out and generate a service principal in your Azure Subscription for development. What the script does is in addition to generating a new service principal it creates a powershell script that will set the service principal as environment variables that can used by Packer. The cool part of doing this way is when you create a CI/CD pipeline the pipeline system can set these same environment variables with whatever account they will use for interaction with Azure.
The idea is that you commit this script to your repository and developers can run the script once to produce a devkeys folder with the powershell to set the environment variable in their current environment. The reason why the script is putting this into a devkeys subfolder is that everything produced in this folder will be masked in the .gitignore to not be checked in.
Make sure you change the subscription name used in the az account set command in this file. Also, you don’t want to run this command more than once because it generates a service principal to your subscription.
packer-createserviceprincipal.ps1 Powershell script.
# ----------------------------------------------------------------
# Set Subscription Context
# ----------------------------------------------------------------
az account set --subscription="My Azure Subscription"
$azAcct = az account show | ConvertFrom-Json
$subId = $azAcct.id

# ----------------------------------------------------------------
# Generate Service Principal with Contributor to Subscription
# ----------------------------------------------------------------
$displayName = "http://PackerExample$(Get-Random)"
$sp = az ad sp create-for-rbac -n $displayName --role "Contributor"
$spData = $sp | ConvertFrom-Json

# ----------------------------------------------------------------
# Store Service Principal
# ----------------------------------------------------------------
$appId = $spData.appId
$appSecret = $spData.password
$appTenant = $spData.tenant

New-Item -ItemType Directory -Force -Path .\devkeys | Out-Null

echo "`$env:AZURE_SP_NAME = `'$displayName`'" > .\devkeys\setupdeveloperenvironment.ps1
echo "`$env:AZURE_CLIENT_ID = `'$appId`'" >> .\devkeys\setupdeveloperenvironment.ps1
echo "`$env:AZURE_CLIENT_SECRET = `'$appSecret`'" >> .\devkeys\setupdeveloperenvironment.ps1
echo "`$env:AZURE_CLIENT_TENANT = `'$appTenant`'" >> .\devkeys\setupdeveloperenvironment.ps1
echo "`$env:AZURE_SUBSCRIPTION_ID = `'$subId`'" >> .\devkeys\setupdeveloperenvironment.ps1

"Wrote setupdeveloperenvironment.ps1 file. Protect this file's service principal secret and do not commit to source control"
I cannot repeat enough how important it is that you protect this file and not commit it to source control. This contains a complete credential to access your entire subscription as a contributor.
There are some things you can do if you want to reduce the surface area of this service credential.
- You could work to have a script that deletes the service principal when your development session is done with the command
az ad sp delete - You could create a service principal with limited scopes using the
--scopesargument on theaz ad sp create-for-rbaccommand. The difficult part of doing this is that packer creates several dynamically generated objects in resources groups and needs to access your final storage resource group. - You could create a new custom role other than
Contributorand assign the service principal to use that more restricted role.
Creating an Azure VM image of Ubuntu with Packer
The next thing to setup is the actual VM disk image you want to generate. The following is a basic packer JSON template for generation of an Ubuntu 18.04 based image. In future posts I will use an image generated from packer like this to create reusable infrastructure with Terraform. There are a couple of considerations for changes in this script when creating your own image.
- The image name starts with “myubuntu” and ends with an ISO formatted date and time. This is useful when it is in a CI/CD pipeline and run often but you might want to change the base name of the image for your use cases.
- The “azure tags” you want stamped on the image. Tags are super useful when trying to tell one image apart from another and your IT department might have some standard ones they require on any generated resources.
- The cloud location for the image. I am generating these in the
East USAzure region. - The VM size for the image. When an Azure image is generated it is based on an image size and that image size should be used when the image is applied in Terraform initially.
A note about the managed image resource group
This packer script generates disk images into a azure resource group named rg-osimages-eaus which was produced by me before running the packer process. This resource group is the deployment target of the image and the source location for terraform pipelines that use these images. Before attempting to run this pipeline make sure you have produced this resource group.
A base Ubuntu Packer Definition
Notice in the beginning of this definition that a series of Packer variables are being established and they are getting their values from environment variables. This pattern was setup by us when we generated the service principal and it is very useful in passing values to it inside an Azure DevOps CI/CD pipeline as well. Normally a Packer definition will have more provisioners than this one. In those provisioners you would run commands to install software and configure the operating system. Since this is a base image we will not do that today but in future posts I will show how those things are done as we produce purpose built images.
I should mention that this syntax is specific to building for Microsoft Azure, if you build for AWS or GCP the syntax will be somewhat different as you are using different builders. The final provisioner syntax comes from the official Packer examples on how to correctly deprovision a Linux VM for Azure using the AzureRM Packer builder.
packer-ubuntubase.json Packer JSON definition:
{
    "variables": {
      "azure_client_id": "{{env `AZURE_CLIENT_ID`}}",
      "azure_client_secret": "{{env `AZURE_CLIENT_SECRET`}}",
      "azure_tenant_id": "{{env `AZURE_CLIENT_TENANT`}}",
      "azure_subscription_id": "{{env `AZURE_SUBSCRIPTION_ID`}}",
      "managed_image_prefix": "myubuntu",
      "working_directory": "{{env `SYSTEM_DEFAULTWORKINGDIRECTORY`}}"
    },

    "builders": [{
      "type": "azure-arm",

      "client_id": "{{user `azure_client_id`}}",
      "client_secret": "{{user `azure_client_secret`}}",
      "tenant_id": "{{user `azure_tenant_id`}}",
      "subscription_id": "{{user `azure_subscription_id`}}",

      "managed_image_resource_group_name": "rg-osimages-eaus",
      "managed_image_name": "{{user `managed_image_prefix`}}-{{isotime \"200601020304\"}}",

      "os_type": "Linux",
      "image_publisher": "Canonical",
      "image_offer": "UbuntuServer",
      "image_sku": "18.04-LTS",

      "azure_tags": {
          "group": "engineering",
          "image" : "Ubuntu"
      },

      "location": "East US",
      "vm_size": "Standard_D4s_v4"
    }],
    "provisioners": [
        {
            "type": "shell",
            "execute_command": "chmod +x {{ .Path }}; {{ .Vars }} sudo -E sh '{{ .Path }}'",
            "inline": [
              "/usr/sbin/waagent -force -deprovision+user && export HISTSIZE=0 && sync"
            ],
            "inline_shebang": "/bin/sh -x"
          }]
  }
The developer build script for Packer
Finally to create a image with packer we want to call the packer executable with a couple of arguments.
- We want to grab our working directory and store it in the envionment variable
System_DefaultWorkingDirectory. The reason for this is that it will mirror what Azure DevOps pipelines would use for the working directory location. This is critical so commands you do in future packer provisioners that use relative paths will match what would occur on the pipeline agent when doing CI/CD builds. This increases also the reliability of packer working the same way in the Azure DevOps pipeline and locally. - We setup the packer definition in a variable so it doesn’t have to be typed every time.
- We run the packer build command
packer buildwith the custom argument-on-error=askwhich gives you a chance to stop the build or retry the step if packer fails.
By the way, in theory you can have lots of packer image build definitions in this source folder and create multiple build scripts for developers. In the CI/CD pipeline this can just become a parameter or variable to the pipeline.
packer-devbuild.ps1 Powershell script:
$env:System_DefaultWorkingDirectory=$PSScriptRoot
$scriptPath = "$($PSScriptRoot)\packer-ubuntubase.json"
packer build -on-error=ask $scriptPath
Putting it all together, building the Packer Image
Now that we have a service account that can access Azure, a way to kick off the build locally, and a simple base definition we can give generation of the Packer image a try. In Powershell change to the directory with these 3 files and assuming you have run the packer-createserviceprincipal.ps1 Powershell already and created a resource group named rg-osimages-eaus you can do the following commands to kick off a build in powershell.
.\devkeys\setupdeveloperenvironment.ps1
.\packer-devbuild.ps1
You should see something like the following output from Packer:
PS C:\projects\myubuntu> .\packer-devbuild.ps1
azure-arm: output will be in this color.

==> azure-arm: Running builder ...
==> azure-arm: Getting tokens using client secret
==> azure-arm: Getting tokens using client secret
    azure-arm: Creating Azure Resource Manager (ARM) client ...
==> azure-arm: WARNING: Zone resiliency may not be supported in East US,
    checkout the docs at https://docs.microsoft.com/en-us/azure/availability-zones/
==> azure-arm: Creating resource group ...
==> azure-arm:  -> ResourceGroupName : 'pkr-Resource-Group-qkib2btyq5'
==> azure-arm:  -> Location          : 'East US'
==> azure-arm:  -> Tags              :
==> azure-arm:  ->> group : engineering
==> azure-arm:  ->> image : Ubuntu
==> azure-arm: Validating deployment template ...
==> azure-arm:  -> ResourceGroupName : 'pkr-Resource-Group-qkib2btyq5'
==> azure-arm:  -> DeploymentName    : 'pkrdpqkib2btyq5'
==> azure-arm: Deploying deployment template ...
==> azure-arm:  -> ResourceGroupName : 'pkr-Resource-Group-qkib2btyq5'
==> azure-arm:  -> DeploymentName    : 'pkrdpqkib2btyq5'
==> azure-arm: Getting the VM's IP address ...
==> azure-arm:  -> ResourceGroupName   : 'pkr-Resource-Group-qkib2btyq5'
==> azure-arm:  -> PublicIPAddressName : 'pkripqkib2btyq5'
==> azure-arm:  -> NicName             : 'pkrniqkib2btyq5'
==> azure-arm:  -> Network Connection  : 'PublicEndpoint'
==> azure-arm:  -> IP Address          : '52...'
==> azure-arm: Waiting for SSH to become available...
==> azure-arm: Connected to SSH!
==> azure-arm: Provisioning with shell script: C:\Users\xyz\AppData\Local\Temp\packer-shell724556143
    azure-arm: WARNING! The waagent service will be stopped.
    azure-arm: WARNING! Cached DHCP leases will be deleted.
    azure-arm: WARNING! root password will be disabled. You will not be able to login as root.
    azure-arm: WARNING! /etc/resolv.conf will NOT be removed, this is a behavior change to earlier versions of Ubuntu.
    azure-arm: WARNING! packer account and entire home directory will be deleted.
==> azure-arm: Querying the machine's properties ...
==> azure-arm:  -> ResourceGroupName : 'pkr-Resource-Group-qkib2btyq5'
==> azure-arm:  -> ComputeName       : 'pkrvmqkib2btyq5'
==> azure-arm:  -> Managed OS Disk   : '/subscriptions/.../providers/Microsoft.Compute/disks/pkrosqkib2btyq5'
==> azure-arm: Querying the machine's additional disks properties ...
==> azure-arm:  -> ResourceGroupName : 'pkr-Resource-Group-qkib2btyq5'
==> azure-arm:  -> ComputeName       : 'pkrvmqkib2btyq5'
==> azure-arm: Powering off machine ...
==> azure-arm:  -> ResourceGroupName : 'pkr-Resource-Group-qkib2btyq5'
==> azure-arm:  -> ComputeName       : 'pkrvmqkib2btyq5'
==> azure-arm: Capturing image ...
==> azure-arm:  -> Compute ResourceGroupName : 'pkr-Resource-Group-qkib2btyq5'
==> azure-arm:  -> Compute Name              : 'pkrvmqkib2btyq5'
==> azure-arm:  -> Compute Location          : 'East US'
==> azure-arm:  -> Image ResourceGroupName   : 'rg-osimages-eaus'
==> azure-arm:  -> Image Name                : 'myubuntu-202104020746'
==> azure-arm:  -> Image Location            : 'East US'
==> azure-arm: Deleting the temporary Additional disk ...
==> azure-arm:  -> Additional Disk : skipping, managed disk was used...
==> azure-arm: Removing the created Deployment object: 'pkrdpqkib2btyq5'
==> azure-arm:
==> azure-arm: Cleanup requested, deleting resource group ...
==> azure-arm: Resource group has been deleted.
Build 'azure-arm' finished after 8 minutes 25 seconds.

==> Wait completed after 8 minutes 25 seconds

==> Builds finished. The artifacts of successful builds are:
--> azure-arm: Azure.ResourceManagement.VMImage:

OSType: Linux
ManagedImageResourceGroupName: rg-osimages-eaus
ManagedImageName: myubuntu-202104020746
ManagedImageId: /subscriptions/.../resourceGroups/rg-osimages-eaus/providers/Microsoft.Compute/images/myubuntu-202104020746
ManagedImageLocation: East US
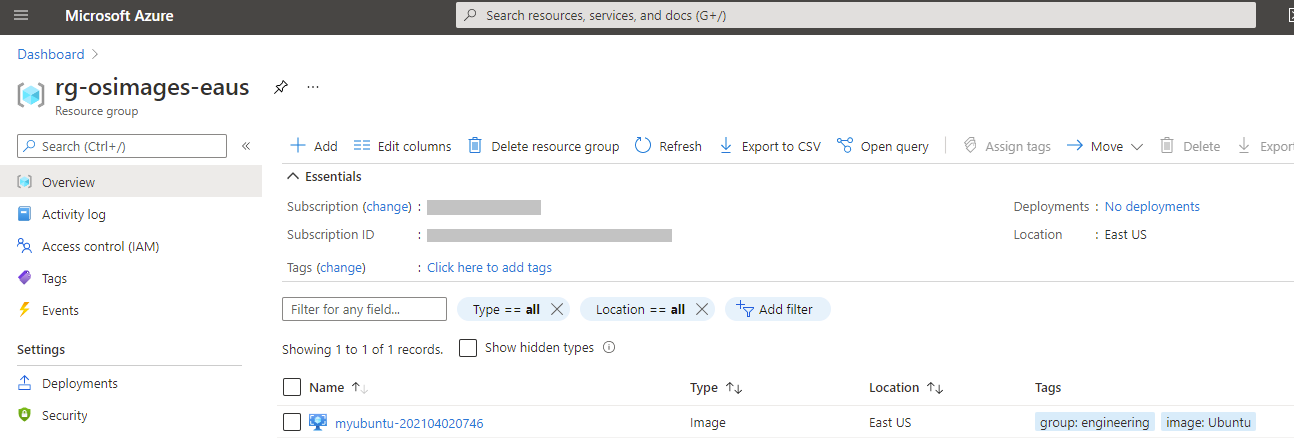
Now that the pipeline has run you should see it in your resource group as an image.
Final Security Note
Make sure that in your .gitignore file you add the following entry to make sure that you or anyone else that uses this repository doesn’t accidentally commit the powershell that was generated that contains your service principal secrets.
.gitignore file addition:
/**/devkeys
Wrapping Up
We have today talked about creating a development experience and environment for Windows when working with Packer and Azure that is compatible with a CI/CD pipeline. It allows a developer who pulls down the repository to type the following commands and build the packer image and extend it.
First time setup post cloning repository:
az login
az account set --subscription="My Azure Subscription"
.\packer-createserviceprincipal.ps1
Building the packer image:
.\devkeys\setupdevelopmentenvironment.ps1
.\packer-devbuild.ps1
Everything we are doing in this process is using patterns that use environment variables in a way that allows you to easily setup a CI/CD pipeline to use these images. In future parts of this series we will cover setting up a development environment for Terraform, creating the Azure DevOps CI/CD pipelines to run these same definitions. Then we will cover how working with Windows based images are a bit different in both Packer and Terraform development from Linux based images. Finally, we will uses these images to create some useful infrastructure in Azure by installing custom products on the images.
- Paul