
Azure Static Website
To create this website I thought I would give a run at using the new Azure static web sites feature that Azure storage can provide. One thing I wanted to understand is how to host the site with reasonably lower costs and at the same time provide a secure SSL connection to the blog.
1. Setup of Azure Storage
First you need to create a storage account for storing your static web site. It can be a standard performance storage account but be sure to mark the account kind as StorageV2 (General purpose v2) to support static web sites. Under advanced options make sure that blob access tier is hot and create your storage account.
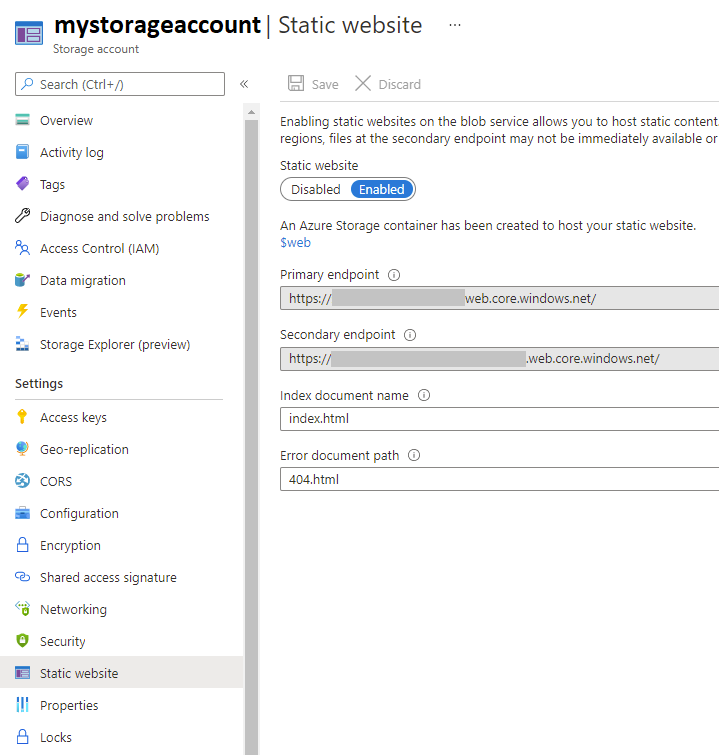
One your storage account is created navigate to the menu option Static website on the left. Then do the following:
Enablethe static website feature- Enter an index document name like
index.html - Enter an error document path like
404.html - Copy the primary endpoint URL site. For example if your primary endpoint is
https://mystorageaccountstuff1.web.core.windows.net/copy only themystorageaccountstuff1.web.core.windows.netpart.
When completed it should look something like this.
2. Enabling the Microsoft CDN resource provider
I must have read the error 20 times when I tried to setup the CDN to present the static web site. It was trying to tell me to enable the Microsoft CDN resource provider but I didn’t understand what it was trying to tell me. Eventually, I found that if you do the following you can enable other providers including ones produced by Microsoft to access your subscription.
- Search for
subscriptions. - Select your subscription name.
- Select in the left hand menu
resource providers. - In the filter type
Microsoft.CDN. - Select the provider row and if it has a status of NotRegistered then select the option on top
Registerand wait for this to complete.
Without this you cannot use the Microsoft CDN provider in the content delivery network. There are other ones you can use but it seems that the Microsoft one is currently the lowest cost on my subscription.
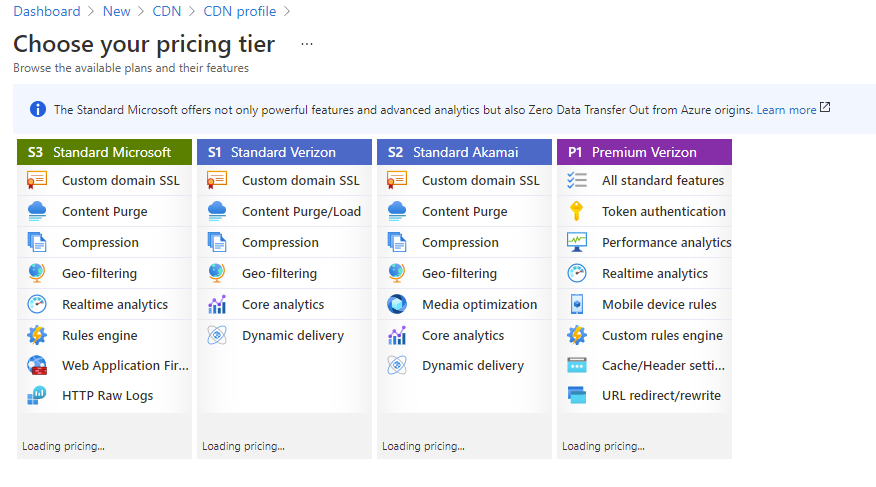
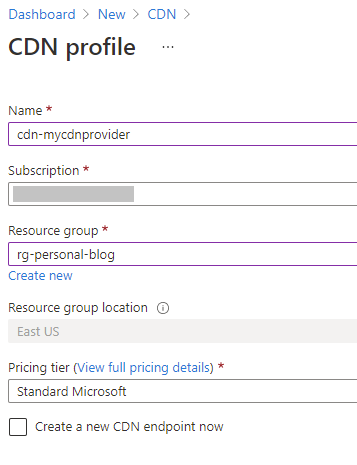
3. Creating the CDN
Next we need to create a CDN. The Content Delivery Network is going to give us a couple of important features. First, it allows us to use a custom domain name. You will need to have purchased one somewhere else beforehand. It also helps us by giving us a free and automatic SSL certificate so you can run your site under https. Finally, it has built in capability of serving up a Azure static web site from storage and caching content for you. You can even set it up to to force the user to use https vs. http.
- Search and create a
CDNresource. - Choose the pricing tier
S3 Standard Microsoft - Don’t select to create a CDN endpoint yet, we will do that next.
Note: if you skipped enabling the resource provider step earlier you will get an error if you try to use a resource provider not yet enabled.
4. Creating the CDN endpoint
This part is the part that is super easy to get wrong and the sequence is very important. Once inside the CDN profile resource select the option endpoint on the overview tab to create a new endpoint.
- Type a name that is your automatically provided name (remember this needs to be globally unique). Something like
bobspersonalblog1. - Select origin type of
Storage static website - Select the storage domain name of your static web site into
origin hostnamefor examplemystorageaccountstuff1.web.core.windows.netfrom earlier when we setup the static website. Note it also appears as theorigin host header - Select
add
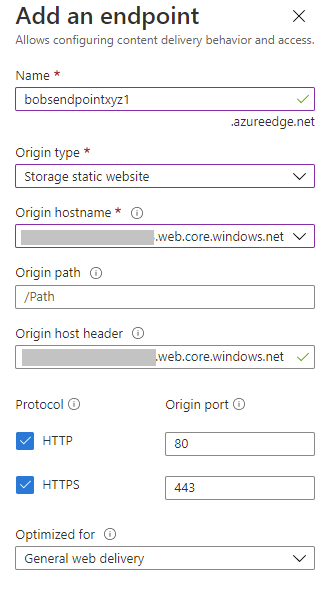
At this point once the endpoint is created you should be able to navigate to your automatic endpoint, in this case http://bobsendpointxyz1.azureedge.net but what we want to do is to enable the endpoint for our custom domain and get an SSL certificate applied automatically.
5. Custom domain
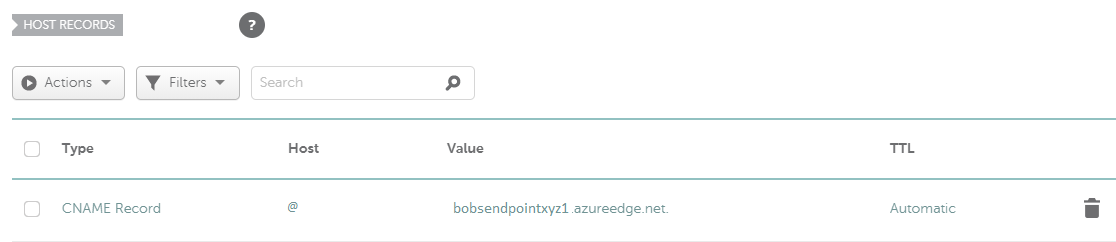
While it is out of the scope of this blog post to describe how you get a custom domain I will share what I did. I own several domains with namecheap. Once you own a domain with namecheap they have for each domain a menu option titled Advanced DNS. I expect each registrar has a place where you can configure your host records. To setup a custom domain you need to create a CNAME record for the domain. Note that I did this a bit different than normally but what you would do is add a new record to your DNS settings for your domain and then forward the “naked domain” or @ for most DNS systems to the fully qualified CDN name, in our case before that was shown to be bobspersonalblog1.azureedge.net. What I did that was different is that I am already forwarding my named domain somewhere else so I created a sub-domain and forwarded it with the CNAME record.
Note: a sub-domain is just a name added before your domain. For example, the
bobsblogsubdomain on bob.com would look likebobsblog.bob.com. When setting up the CNAME record instead of using the naked domain symbol@you would put in the sub-domain name ofbobsblog.
Once the custom domain is mapped with a CNAME to the endpoint you can configure Azure CDN to use the custom domain. Give the DNS system a bit of time though to replicate - the Internet is a big place.
6. Applying the custom domain to the endpoint
- Back inside the CDN resource in azure select the endpoint
hostnamerecord. - Select the
custom domainbutton - Enter the custom domain name of the domain you mapped to this endpoint. For example, if you mapped the “naked domain” using an
@of bobsblog.com you would enterbobsblog.com. - If it can find the CNAME you set in your domain register’s DNS system for the domain to match the endpoint it will allow you to continue. At this point press
Add.
If it can’t find a DNS record make sure that you put in the valid CNAME entry and pointed it to the correct CDN endpoint name. The error message will tell you all of that. Also, make sure you waited long enough for the DNS CNAME record to replicate. For me it took like 5 minutes to be available.
If all goes well you should see a custom domain now listed under your endpoint’s list of custom domains.
7. Enabling your CDN managed SSL certificate.
Once your custom domain is applied. Click on the custom domain record and do the following:
- Select
Onfor the Custom Domain HTTPS setting. - Select
CDN managedunless for some reason you want to pay for another certificate since the CDN one is free and automatically renewed for you. - Select a Minimum TLS version of
TLS 1.2cause its just good for security. - Select save and wait while the system automatically gets a certificate and provisions and applies the certificate. This will take a while as mine took another few minutes.
When done the endpoint custom domain should say Enabled for Custom HTTP and for details it should say Certificate successfully deployed which I think indicates it replicated the certificate out to the content delivery network endpoints.
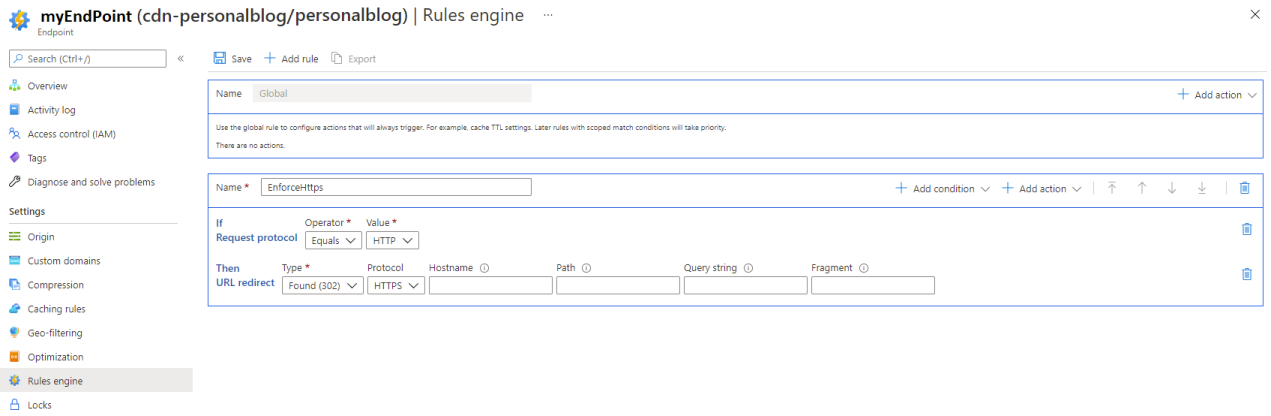
8. Forcing HTTP to redirect to HTTPS
If you have selected your CDN endpoint you can select the option Rules engine on the left.
- Add a rule by selecting
Add rule - For name you can call it
EnforceHttps - Select
Add conditionof typeRequest Protocol - For the condition if request protocol set the operator to
equalsand valueHTTP - Select
Add actionof typeURL redirect - For the condition then URL redirect set the type to
Found (302)and the protocol toHTTPS - Press
Saveand this should now automatically redirect anyone hitting your static web site to HTTPS if they use HTTP.
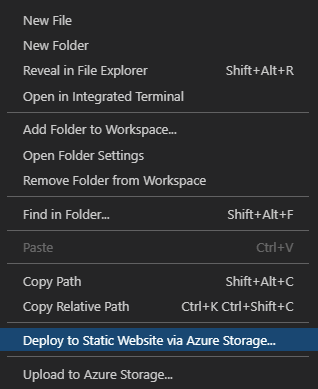
9. Push your content to azure storage
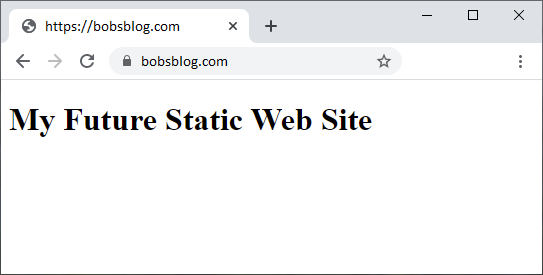
There are endless ways to send your content to azure storage but one simple way is to define your html files in VS Code and use the extension called Azure Storage. If you create a simple index.html page with the following content:
<!DOCTYPE html>
<html>
  <body>
    <h1>My Future Static Web Site</h1>
  </body>
</html>
Also you should create a default error page like this simple 404.html page with the following content:
<!DOCTYPE html>
<html>
  <body>
    <h1>Oops, we don't have that page.</h1>
  </body>
</html>
Then right clicking in Visual Studio Code on the explorer view where no files are (below them) select the option Deploy to Static Website via Azure Storage... and selecting your storage account should send the files you are editing to the web site.
You should then be able to navigate to your custom domain and see your new page.
Today we talked about how Azure static web sites when combined with Azure CDN can give you a very powerful static website hosting platform. It gives you support for custom domain names, automatic SSL certificate management and all using some very simple tools once setup. While the setup has several steps once created it can be used with lots of static web site authoring tools to create a new presence for you on the web. If you look into the pricing of this solution, unless you become Facebook popular this should cost a few dollars a month - max.
- Paul